How to Increase RAM in Window 7/8/10
Hi guys, I am back with a useful article which can increase your pc’s speed. If you are a game lover, and can’t run your favorite game due to low ram, then this post will help you. Suppose you bought a pc for your college/office use. Then you realize this pc couldn’t satisfy your requirements. This hasn’t enough ram to run required application or games. Usually people buy a low ram pc due to not knowledge of RAM or due to low budget.
Low RAM is main reason of slow computer. There two methods to increase your ram.
1. Adding extra physical RAM
2. Using virtual RAM
Not every computer support dual slot to add extra physical RAM and physical ram are more expansive than ordinary memory chip. In this Post, we will use virtual ram to increase your computer ram. We will use your Hard Disk Space for this purpose. Don’t worry you don’t need to download any third party software.
What is RAM and Virtual Memory in Window computer or laptop?
RAM is used for random access memory. RAM is primary and faster memory than other storage memory. When a program run, all data of this program stored in RAM. All process such as calculation, decisions is executed in RAM and results are stored in secondary storage devices such as hard disk. RAM is found in every device such computer, mobile, printers etc.
When computer lacks the RAM needed to run a game, program, in window os, window uses Virtual memory to store temporary data. Virtual memory uses your space available on hard disk. When RAM doesn’t have space to store additional data, virtual memory move data file RAM to paging file (space).
How to increase RAM using Virtual memory size
1. In window 7, first click on Start button then right-click on Computer and then click on Properties. You can also use this path control panel >> system and security>> System. Here you will find basic computer information such window version, processor, system type and RAM.
2. Left side you will some additional setting such as device manager, remote setting, system protection, advance system settings. Click on Advanced system settings.
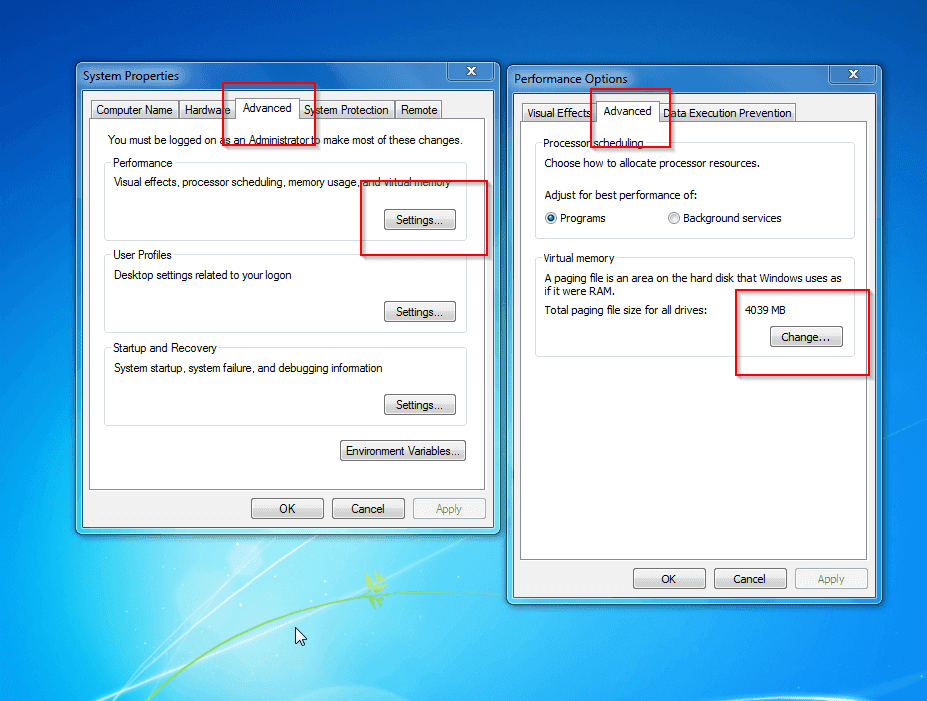
3. A new will pop out, under Performance, click on Settings.
4. Another window will pop-out. Click the Advanced tab, click on Change.
5. Remove tick form the “Automatically manage paging file size for all drives” check box.
6. Here you will see your drives, under Drive [Volume Label], click the drive that contains the paging file you want to change.
7. Click Custom size, type a new size in megabytes in the Initial size (MB) or Maximum size (MB) box, click Set, and then click OK.
Remember in this trick you are not increasing size of physical RAM, instead you are giving an addition space (virtual memory) to your ram so that your computer work fast.
You can also buy new RAM for your computer and you can also use some premium software to increase your RAM.
This trick works fine in Window 7, Window 8 and Window 10.


0 comments:
Post a Comment