Showing posts with label Blog tricks. Show all posts

Saturday, 2 April 2016

How to share block shorte.st link in facebook?

share block sh.st link in facebook image
Hi guys, i hope you must read my post How to make money from blog using url shorten, where i describe some url shorting site, one of them best site was short.st. Many of user using this site to earn, but some of them facing a problem that now facebook treating short.st as spam, so they are not able to send their link in facebook. 
If you share a huge amount of your shorte.st links on Facebook, they can sometimes be blocked. In this post I will show you how to post your shorte.st links on Facebook and benefit from it.
The first thing you can do in order to avoid blocking your links is posting them carefully. By sharing too much links in a small amount of time (mass posting) you run the risk of your links being blocked by Facebook algorithm.
desktop
Below I present what else you can do to share links on Facebook.

Use alternative shorte.st domains

The best way to bypass facebook spam algorithm is changing domain. Yes it work fine.Here’s a list of shorte.st domains you can use in order to substitute sh.st: 
  • t6vr.com,
  • pj45.com,
  • jnw0.com,
  • g3y5.com,
  • 5k4i.com,
  • 0px.me,
  • fryydi.com,
  • dryydi.com,
  • sryydi.com,
  • blo.bs,
  • n4gk.com,
  • juy.be,
  • u2ks.com
You can substitute sh.st with them and here’s how to do it:
  • Take your shorte.st link, i.e.: http://sh.st/zVr8Copy the back half of your link (in our example it’s: zVr8)
2
  • Put this code after one of the shorte.st domains, for example: “fryydi.com”:
3
  • You can post the link on Facebook now, or…

Hide your shorte.st link behind ‘bitly’ and its alternatives

You can also use popular bitly to hide your link or to defeat the facebook. Choose a shorte.st link you wan’t to share, for ex.: http://sh.st/zVr8 .  Go to bitly.com and shorten this link:
bitly
After 1 sec you will have a link ready to use. Just copy and paste it on Facebook.
bitly2

HINT:

Use our alternative domains randomly in order to prevent blocking them on your Facebook account. Also, try not to post links in too small time intervals.
continue reading How to share block shorte.st link in facebook?

Monday, 21 March 2016

How to add stylish fonts in your blog?

Google fonts for blogger image

How to Add Google Web Fonts to Blogger Blog

I think many of you had seen stylish fonts on many blogspot blog, which give a stylish look to blog. So today I am sharing how you can add stylish fonts. This is simple trick to add stylish fonts on your blog, you are going to use google again, not search engine, google Web fonts. Lest see what’s google web fonts and how to implement them in your blog.


What is Google Fonts?

GoogleFonts is an open source font directory site hosted by Google, provides popular Fonts. These fonts can be used by programmer for web fonts with free of charge.

3 ways to use google fonts:

There are 3 ways to use google fonts to your blog.
1. Using Link.
2.Using CSS;
3. Using Javascript

You can use any fonts to your website in above 3 types mentioned. Just choose any one of the methods on fpage which you would like to use. This tutorial explains how to add the Google Fonts for your web pages. 

3 Way to use or add google web fonts to blogger 

#1 Using Javascript 

1. First go to  Google Fonts.
Google fonts for blogger image
2. Choose any one of the fonts from the list,
Select 'Quick Use' option from that selected font
Google fonts for blogger image

3. New page will open choose addition setting (optional) and click on javascript (third option).

4. Copy google font's javascript code.

Google fonts for blogger image
Note>>Before updating changes in your blogger template make sure you have backup your blog template.
5. Go to your blogger dashboard and then select layout option and add a new HTML/javascript gadget.

6. Paste your javascript code and done

#2 Using   Link


1. First Go to  Google Fonts.

2. Choose any one of the fonts from the list.

3. Select 'Quick Use' option from that selected font.

Analyze the font with 'Impact on page load time' and make sure to select the best one for your website which is not affects your website. Select the type of usage which you want to use.
4. Copy google font's standard href link
Example: <link href='http://fonts.googleapis.com/css?family=Droid+Serif' rel='stylesheet' type='text/css'>
Note>>Before updating changes in your blogger template make sure you have backup your blog template.
5. Go to your blogger dashboard and then select template option.

6. Find of your template source code. Copy the generated code which you get it from the font selection page (refer step 4) and add or paste that code after <head> tag.


Example:

After updating google font your webpage source code will be like this,
<head>
<link href='http://fonts.googleapis.com/css?family=Droid+Serif' rel='stylesheet' type='text/css'>

Save the blogger template. Now goto your blogger or web site's homepage to see the updated font style with new look.


#2 Using CSS

You can customize you page fonts as well as your headline, side bar anything using ccs code.
Follow same 3 step as above described.

4 Now copy CSS code form @import option.
5 Go to your blog's template, then click on customize and select advance.

6 Pate your css code, and click on apply to blog.
For example if i want to use font only for heading then i will put such code 

Google fonts for blogger image

h1{font-family............... }

Note>> In future you can remove css code from same section.


Do you have any doubts in how to add / use Google Fonts to your blogspot blogger just leave a comment.


continue reading How to add stylish fonts in your blog?

Sunday, 6 March 2016

How to Get Free Traffic detail in blogger?


When we write a post in blog, we focus on our audience.Without focusing on audience there is no mean to write post in blog/website, but when you notice your blogger's stats its not provide full detail of your audience. So we have to take help of Third party website, one of them well name free site is Google Analytics. It will help you to get full stats of your site, such as what's type of post seen in your blog? How much time they spend in particular post? and so on. It is my personal advice to every blogger to have a google Analytics account and understand your audience, what they want from you?


if you don't have any blog:create here

Powerful Feature of Google Analytics:


1. Figure Out Where Your Audience is Going By Tracking Outbound Links
2. Get Real Time Statistics (Kind of)
3. Track Social Media Buttons
4. Create Custom Campaign URLs to Track the Effectiveness of Link Building Campaigns
5. Use Custom Variables to Refine Data

It is a free service that provides advanced statistics about the traffic and visitors to a website or blog that the blogger’s own stats just could not match.

And you should use Google Analytics to your blog as it provides in-Page analytics to see how users really interact with your pages. Know how visitors are coming to your site, understand what they are looking for and what learn they are sharing or how and why they are leaving.


#1 How to add Google Analytics in Blogspot


Step-1:  Log in to your Google Analytics account. If you do not have a Google Analytics account then go to google.com/analytics “Sign Up” to Google Analytics.


To get more traffic add whatsapp sharing button

Step-2: Fill-up the Information as your blog;s name , link etc and Create a Google Analytics Property for your Blog

If do not have an Analytics account then the next page Titled “New Account”; click “Website” in “what you like to track”; Select “Universal Analytics”, Fill-up the information below and insert your blog/website URL than click “Get Tracking ID” and then “Accept”.

Step-3: Now go to admin option here you will see Website tracking codes, Copy the Tracking Code


Step-4:  Go to your Blogger dashboard and click on  Template,Open the template editor by clicking “Edit HTML”.


Step-5: Search for </body> in the template editor and Paste the Google Analytics Tracking just before the </body> and Click “Save Template”.

That’s all is required to Google Analytics in Blogger blogs. Within few minutes you will see your website data on Google Analytics Reporting section.


Don't forget your blog design: free upgrade to pro blog

#2 Add Google Analytics in blogger (Alternative) 


step-1: Go to your Blogger dashboard and click on  Template,Open the template editor by clicking “Edit HTML”.
Then search for:-


If you cannot find it in the template, then search for </body> and paste the above code just below it and click “save template”.

Step-2: Now go to Blogger Settings , clikc in Other  here you find  Google Analytics click in it and
Paste your Google Analytics Tracking ID

Step -3:  Now In the text box (Analytics Web Property ID) > Click “Save Settings” button on the right-top corner of that page.


Now start post that what your audience love.


continue reading How to Get Free Traffic detail in blogger?

Friday, 4 March 2016

How to add leverage cache file in blogger?

Importance of cache file in blogger


Greeting to all friends,
When we discuss about our blog speed, we mention many points such as image size, useless gadget, size of main page(home page) and  heavy java script or css files. But one important point we forget that is Cache in our blog?  Cache is most important factor in speeding
up your blog 10 times faster. Since almost every blog writer(admin) never notice this point or he may ignore this point. So i m trying to discuss this main factor How to add cache file blogspot ?
In blogge there is no direct option for uploading any cache file to blogger as in wordpress hosting we can upload file direct to wordpress. Before we put our cache file to blogger lets learn what is browser cache and its important.

Also read: How to add whatsapp sharing button in blogger?

Cache definition and its important?

Browser caching stores webpage files on a local computer usually in your computer driver or mobile's phone storage as cache, when a user visits a webpage. So when next time user again visit to your website/blog, browser open your blog and  cache file too. Result is fast loading of your website. Cache file not always available for browser, there is self destruction command on cache file. Thus cache file expired in 3 days (as user defined time).

Can i control cache in browser/blogger? 

Yes! yes you can control your cache file. If you want to control or modify the time of destruction you have to understand a new term called Leverage?
"Leveraging" browser caching is when a webmaster has instructed browsers how their resources should be dealt with.

In simple word leverage means how longer your cache will available for browser? When a web browser displays your webpage it has to load several things like your logo, your CSS file, and other resources.

When you leverage browser caching, your webpage files will get stored in the browser cache. Your pages will load much faster for repeat visitors and so will other pages that share those same resources. If you have tested your blogger for speed and found out that you need to leverage browser caching, (if you not tested your blog speed test it) now in  here is how you do it.

How to add cache file in blogspot?


Step1: First of all login your blogger account.

Step2: Now go to Template of your blogger and Click on Edit Html

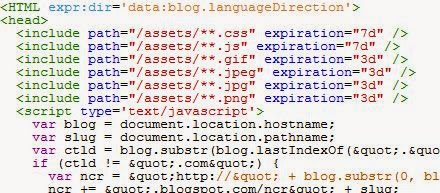
Step3: Find using (ctrl+f)  <head>  and paste the following code after "<head>" .


Step4. It will look like this screen shot and Click on save now.


Detail of codes: "expiration" referred for the time in which your cache data will expire. Here i fix time to 7 days for CSS and Java script file and 3 days for images, you can change it with your own.

Note>>Don't set long expires date for blogger blog's file in leverage browser caching header. Since if you set long expire date then it will take some time for update the changes from your blog.

Don't forget to read: How to become pro blogger?

Now your blogger much faster then usual ;)


continue reading How to add leverage cache file in blogger?

Thursday, 3 March 2016

How to add Whatsapp sharing gadget on blogger?

Whatsapp sharing widget for blogger

whatsapp sharing button gadget image

Greeting to my all Friends,
 I think all you are ready with your and you must posted  some good article on your blog.That good but do you think for your audience source? I mean what are your source of traffic? If not yet ! so start aiming your audience.

When you analyze about traffic, you must point to social networks for your traffic.This is the reason why there are so many Social sharing widget (Facebook, twitter, google plus and linked in...) in your template.Wait a minute did i say all social networks? Whatsapp! where is it? There no option for sharing your post to whatsapp.
So today i going to tell you how you will add a Whatsapp sharing widget in your blog.

Why share to whatsapp button in blogger?

whatsapp sharing button widget blogger image

We never forget the power of whatsapp , since there 1 active Billion User, so you have a chance to get some traffic from there. Many of people have a fever of sharing every post,video and images to whatsapp, from a report of Wikipedia everyday 10 billion messages shared each day ,so take it as an advantage and catch some traffic.
Other reason to choose whatsapp is Groups of Whatsapp, Join some groups of whatsapp and share you post in groups definitely you will get hits on you blog.

How to add Share to Whatsapp widget in blogger?


Step 1. Log in to you blogger account, and go to layout option at left side of your blogger.
layout in blogger image

Step 2. Click on add a gadget and add a HTML/Javascript gadget to your blogger.

add a gadget in blogger image

Step. Paste the following code to your HTML/Javascript gadget and save gadget.


Share to Whatsapp Codes for blogger:


Step3. Use drop Down  to replace it in your layout.


Optional setting: Share to whatsapp

Note>> Please don't use this setting if your template not allow. 

This is an optional setting if you don't want to show your widget in PC

(a). Name that HTML/Javascript as Share to Whatsapp or whatever you like.
(b). Go to Template of your blogger and click in Edit HTML.


(c). Search (ctrl+f) for your whatsapp share widget. In my case it was name with Share to whatsapp, so i will search for Share to Whatsapp.

(d).  Now Add an extra attribution such that   mobile="only"  just after locked='false' and save your template. See screenshot for help.


Now your Widget is only seen in mobile ;)

continue reading How to add Whatsapp sharing gadget on blogger?

Tuesday, 1 March 2016

5 Brilliant Tips To Make Your Blog like A Pro Website

Replace ordinary blog to Pro blog
become pro blogger image

Greeting to my all friends,
I hope you all upload a responsive template in your blog, but you find some disorder in you website. Lets take an example of About Me section of your website, there should be your photograph with your Bio, But by default there is another photo and description of other website.
So it is necessary to replace this description with you own. So today i m going to share how will you remove/replace default data of template?


How to customize blogger template?


#1 Multiple Gadget/widget: 

Multiple Widget
Multiple popular post widget in template

If you upload a template, you will see there are many unnecessary gadget in you blog. Lets take an example of multiple post gadget, more than one Popular post Gadget would seen in your blog. This multiple popular post will give unpleasant look to your blog. So its necessary to unnecessary popular post gadget from your blog. Its recommended to use only one popular post. This will make your blog load faster as well as give an attractive look.

Remove Unnecessary Gadget

  1. Fist log in to your blog with your gmail account.
  2.  Now go to "layout" at the right side, here you will see your all gadget. Here  you can add or delete your all gadget. 
  3. Click on edit option of those widget/popular post widget which are unnecessary. 
  4. Here you will see remove option, click on it. In popular post gadget you can also edit how many post should be shown in popular post section .
  5. If you want to re-adjust you popular post gadget, use drop down(use you mouse to drop it another place) and click in save arrangement.

Note>> It is advisable to place popular post where it is easily visible to your visitor, since your popular post section contain best article of you blog, which will make busy your visitor with your website and give strong temptation to visitors read more article. Popular Post section really take important place that visitor will bookmark your blog or not, may he return or not. So think twice where you going to put your popular post section(gadget).

These are some places where popular can be easily seen.
1.Right or Left side of you Homepage
2.Just after your post.
3.Between your post.

Remove Ads widget

example of Ads on template
example of ads on template
When we apply a free template to our blog, demo ads widget are installed in it. So its really important to remove them.
Follow above step, to remove ads gadget from your blog. 

#2 Rename Items on Drop Down Menu

Drop Down Menu
Disorder sub menu

Many of you choose a template for its attractive drop down menu, but when you apply this template your blog you may find results are different.
Suppose your blog is about Particular sport but you drop down showing menu like Free software, Blog template etc. It will look so odd on you blog.

Just follow these step to makeover Drop down menu.
1.Go to you blog's template section and click on Edit Html
2. Now search (ctrl+f) for those texts which are in your dropdown menu, such as Download.
3. Keep searching until you find some codes which look like


<div id="cssmenu">
<ul>
<li class="active"><a href="index.html"><span>Home</span></a></li>
<li class="has-sub"><a href="#"><span>Software</span></a>
<ul>
<li class="has-sub"><a href="#"><span>Download</span></a>
<ul>
........................
.......................
......................
</ul>
</div>


Tips:
Some time there more than one Texts you may find in your search result so , choose such texts from your drop down menu which look some unique. If you don't have knowledge about xml or html language please Don't try to search Home , Contact us or About type text in your search because there bulk of result will outcome.

4. First replace the download type text with you own, e.g. for a status providing blog, replace it with Attitude Status. or whatever you like and replace # with a link.

Take a look on example: Suppose you want to change Download text with Attitude status, so first go to your blog Find your label/tag section and copy the link of this section. Now replace # with this link, when visitor click on Attitude status from menu he will redirected to Attitude status section, see all post having tag Attitude status.

5.Keep changing all text.


#3 Edit About Me Section

Use the same technique mention above, with some minor changes to replace your About me section
  1. First go to you template,click on edit template and search for About Me/Author profile
  2. You will find some highlighted result of About me, search for those About me section having a description (based on your template). 
  3. Now replace the Description with your own, if you find some link replace them too.
  4. Here you may find a image, which you need to replace with your own.In Template, no direct image may used instead of there is a link of image. You need to replace this link with your own image link. If your image is directly form google, use link of that image. About me default image

Note>> Some template allow to edit About me directly from layout, so before proceeding to template must check you layout section.

Put Description of About me

#4 Put you Social Network Links

Social Network section
Social Network section in template                        

This is most important section for your blog, if your know that your blog's 99% traffic came from Social Network(whatsapp,facebook, twitter).Go to stats of your blog and see the traffic source, you will get your answer.
 In social share section you have to fill up links of your social fan pages. You can also add you social account link to this section.
If you don't know about how to create a attractive social share section, please wait for few days. I will share a brief post about this.

#5 Put attractive Logo and Favicon 

You really agree with me, that you have seen this
Default Favicon of blogger
  logo in every blog, so they don't look like a pro blog.
If your blog don't have an logo it will not look like a pro website. So create a attractive logo for you website which define your blog best. There are many online site which can create a free logo for you, or you may take help of Photoshop, picsart or other photo editor.
Note>> Your Favicon must be square shape and your logo shouldn't be large in size otherwise it will make your blog non responsive (take up to one minute to load).

I am assuming you are ready with your logo and fevicon.

  1. Go to your layout section, click in Your blog name(Header).
  2. Add Logo in your blog
    Add logo to your blog
  3. A pop out will show upload option, choose your logo from computer and upload it. You can choose many option like where you logo would be shown?, Should it has also description of website? etc.
  4. Now time to upload favicon, in layout section click in favicon and upload your Square favicon and its done.
There are more tips for your blog, please keep visiting. :)


continue reading 5 Brilliant Tips To Make Your Blog like A Pro Website

Saturday, 27 February 2016

Responsive template:How to customize blogspot blog?

How to Install a Template on Your Blogger Blog 


So you are ready with your blog, now its time to make your blog user friendly (Responsive) , Eye catchy, SEO friendly and Ads ready. Since blogger also provide its own themes,which  not give a pro look to your blog.
So we need to upload Template, which help you to customize your blog. Before you upload your template, you need to a Responsive, ads ready and SEO friendly Template. You don't need to search this on google i listed some best Template just download them.

If your don't have blog read: how to create a blog?

Customize your blog


1.Sign in using your Google account. :

Before you customize your blog, you should sign in to your blog with your g-mail and password.

2.Go To Template: 

Now go to your template setting at the left side of your blog.


3.Click on "Backup/Restore" button at the top right corner as shown
Click on Backup/restore option, which is situated at right side of your blog.

4.Click “Choose File” and upload a .XML template from your hard drive. 

Now you need to upload your beautiful Template of .XML extension, go to your folder where your save your template And click on Upload.

5.Now Turn Off mobile template

If you don't "show off your mobile template",Your mobile user fan will not able to see your customize template instead they may see the blogger default mobile template(If your template not allow mobile template). So click on "No. Show desktop template on mobile devices"

SEO Friendly and Responsive free blogger templates:

I m sharing Best 5 templates, choose which make your  blog beautiful.
I m not going to mention individual feature of each template but i m listing some common best feature of these template. This are the reason why should you use this templates only?

Feature:

  • Responsive
  • SEO Ready 
  • Ads Ready
  • Social bookmark ready
  • Pre-install top widget
  • Drop Down Menu
  • Attractive color and style
  • Thumbnail Posts
  • Fast Loading comment box and much more
Use them at least once any compare with your template if you ever installed.

Note>> Please don't judge template by their name click on LIVE PREIVEW .

mSora Template


Vienna Lite 2


Idea Mag


mBlog


Mag Zilla 


I will Keep updating this Templates so keep visiting :)

I m not the creator of all above mention templates.


continue reading Responsive template:How to customize blogspot blog?